How do I do anchor posts in WordPress?
If you’re like me, you love to write long and detailed blog posts that cover every aspect of your topic. But sometimes, you might want to make it easier for your readers to navigate your content and jump to the sections that interest them the most. That’s where anchor posts come in handy.
An anchor post is a blog post that has links to different parts of the same post, usually at the top or in a sidebar. These links are called anchors, and they allow your readers to skip to the relevant sections without scrolling through the whole post. Anchor posts are also good for SEO, as they help Google understand the structure and hierarchy of your content.
So how do you create an anchor post in WordPress? It’s actually quite simple, and you don’t need any coding skills or plugins. Here are the steps:
1. Write your blog post as usual, using headings to divide it into sections. You can use any heading level from H1 to H6, but I recommend using H2 or H3 for the main sections and H4 or H5 for the sub-sections.
2. Decide which sections you want to link to from the top of your post. These will be your anchors. You can link to as many or as few sections as you want but don’t overdo it. A good rule of thumb is to have one anchor for every 500 words of content.
3. For each anchor, create a unique ID that describes the section. For example, if your section is called “How to choose a WordPress theme”, you can use “choose-theme” as the ID. The ID should be lowercase, without spaces or special characters, and preferably short and descriptive.
4. Add the ID to the heading of the section you want to link to. To do this, switch to the HTML editor in WordPress and find the heading tag. For example, if your heading is `
How to choose a WordPress theme
`, add the ID inside the tag like this: `
How to choose a WordPress theme
`. Repeat this for all the sections you want to link to.
5. Create the links to the anchors at the top of your post. To do this, switch back to the visual editor and type the text you want to use for each link. For example, you can use “How to choose a WordPress theme” as the link text. Then, highlight the text and click on the insert/edit link button in the toolbar. In the URL field, type a hash symbol (#) followed by the ID of the section you want to link to. For example, if you want to link to the section with the ID “choose-theme”, type “#choose-theme” in the URL field. Click on “Add Link” and repeat this for all the links you want to create.
6. Preview your post and test your links. Ensure they work properly and take you to the right sections of your post. If not, go back and check your IDs and URLs for any typos or errors.
That’s it! You’ve just created an anchor post in WordPress that will make your readers happy and boost your SEO. Now go ahead and write some awesome content that deserves an anchor post!
How to Add Anchor Links Manually.
In WordPress, anchor links can be added primarily in two methods. Anchor links can be manually added with the WordPress Block Editor. Alternatively, you can use a plugin to add anchor links to your table of contents.
The process of adding anchor links to your post is really simple. With WordPress’s Gutenberg Editor, it’s quite simple. Anchor links can now be added without the need for a plugin.
Let’s investigate the Block Editor’s capabilities for this.
Select the header in the first step, then click the “Advanced” button on the right. Next, type the anchor text into the “HTML Anchor” field.
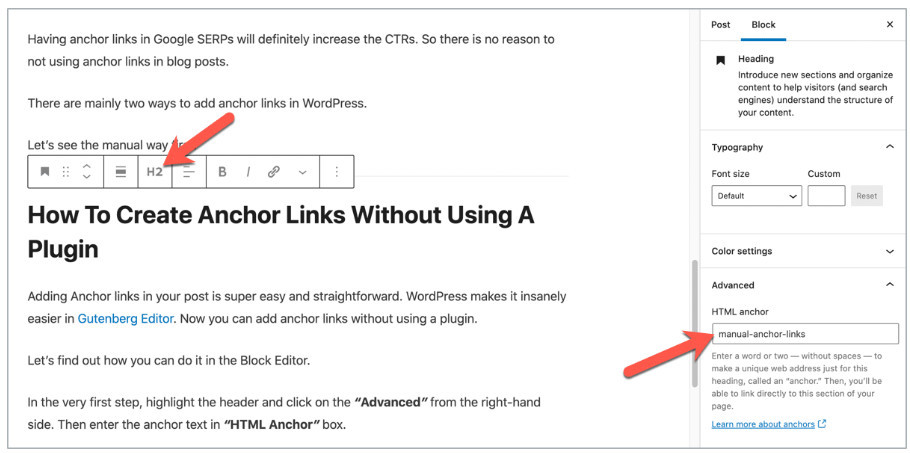
Simply return to the desired link location after that. Simply pick that text and link it before the anchor name with a #. Take a look at the screenshot below:
That is all.
Your WordPress post now has anchor links that you manually added.
YouTube Video on Internal Linking.
Using a Plug-In.
The easiest and most effective way to do internal linking is to use a plug-in. To start with I felt like I was cheating and should be using the sweat of my brow instead. It did not take me long to realize that the amount of work I would have to do, just to catch up would be considerable on its own.
So I have introduced a plug-in tool called “Table of Contents” This plug-in is retroactive and has provided an incredible experience for all my readers. I could not be happier at this stage.
Final Thoughts.
Using the plug-in has freed up my time so I can now spend my time improving my posts and not just “doing enough” to get away with it.
Google is now expecting us to provide a superior experience to our readers and we should be using these tools to help our readers navigate around our websites and make it easier for them to answer their questions in full.
Steve Hey 
Some links on this site may be affiliate links, and if you purchase something through these links, I will make a commission on them. There will be no extra cost to you and, you could actually save money. Read our full affiliate disclosure here.